

Imagine you spent weeks collecting data customer records, sales reports, survey results all neatly saved in folders on your laptop. Then one day, your laptop dies. No warning. No backup. Everything gone.
This is not a horror story. This happens to real people every single day.
The solution is simple: The Cloud. And the easiest place to start is Microsoft Azure Blob Storage a service that lets you store any file, any size, from anywhere in the world. It costs nothing to get started, takes 60 seconds to set up, and requires zero technical experience.
Let’s get into it.
“Your data is sitting on your laptop right now. One crash, one spilled coffee, one stolen bag and it’s gone forever.”
The Hard Truth
WHAT IS AZURE BLOB STORAGE? (For Complete Beginners)
Before we start clicking buttons, let’s understand what we’re actually doing because understanding the “why” makes every step easier.
Azure is Microsoft’s cloud platform. Think of it like renting computing power and storage from Microsoft instead of buying your own servers. Big companies like Coca-Cola, BMW, and Samsung use Azure to run their entire data infrastructure.
Blob Storage stands for Binary Large Object Storage. Don’t let the name scare you. In simple terms, it’s just a place to store files in the cloud exactly like Google Drive or Dropbox, but built specifically for data engineers and developers. You can store CSVs, Excel files, images, PDFs, videos, JSON files, or any other format.
A Container inside Blob Storage is like a folder on your computer. You create containers to organize your files. For example, you might have one container called “raw-data” and another called “processed-data.”
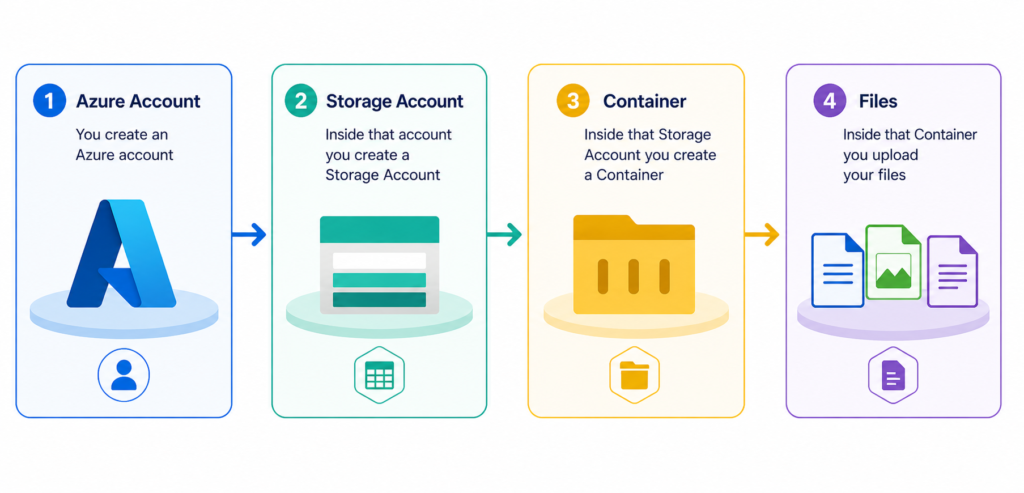
Here’s the full picture in one sentence: You create an Azure account → inside that account you create a Storage Account → inside that Storage Account you create a Container → inside that Container you upload your files.
Simple. Let’s do it.
BEFORE YOU START – Prerequisites Checklist:
You only need four things. Check them off before moving forward:
-
Email address: Gmail, Outlook, Yahoo, or any email works perfectly fine.
-
Phone number: Microsoft will send you a one-time SMS code to verify your identity. Any mobile number works.
-
Credit or debit card: This is only for identity verification. Microsoft places a temporary $1 hold on your card, which is refunded within a few days. You will NOT be charged anything for this tutorial.
-
A file to upload: This can be any file from your computer. A CSV, an Excel sheet, a PDF, even a photo. Anything under 200MB works.
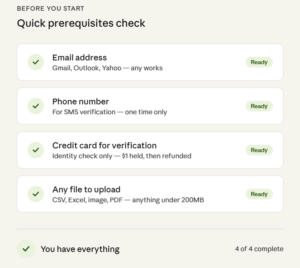
Total cost to you: $0 Total time needed: 60 seconds Experience required: Absolutely none
“Azure gives you $200 in free credits the moment you sign up. That’s Microsoft betting you’ll love it and they’re usually right.”
Pro Tip
STEP 1 : Create Your Free Azure Account:
This is the only step that feels slightly long because Microsoft needs to verify who you are. But don’t worry, we’ll walk through every single click.
1.1: Open the Azure Website Open your browser and go to: portal.azure.com You’ll land on the Microsoft Azure homepage.
1.2: Click “Try Azure for Free” Look for the big button that says “Try Azure for free” or “Start free.” Click it. Microsoft will immediately offer you $200 in free credits that last 30 days more than enough for this tutorial and much more.
1.3: Enter Your Email and Create a Password Type in your email address and create a strong password. Use any email you have access to Gmail, Outlook, Yahoo, all work perfectly.
1.4: Verify Your Email Microsoft will send a 6-digit verification code to your email inbox. Open your email, copy the code, paste it into the verification box, and click Verify. If you don’t see the email within a minute, check your spam folder.
1.5: Add Your Phone Number Enter your phone number. Microsoft will send you another SMS code. Enter that code to confirm your phone. This is a one-time security step they won’t spam you after this.
1.6: Enter Your Card Details Enter your credit or debit card information. Remember this is only a $1 identity hold that gets refunded. Microsoft is confirming you’re a real person, not a bot. You will not be charged for anything in this tutorial.
1.7: Complete Verification and Enter the Portal After completing the verification steps, Microsoft will confirm your account. Click “Go to Azure Portal.”
You’re in. Your $200 in free credits are now active and ready to use.

Welcome to Azure. Take a second to look around and this dashboard is where all your cloud resources will live.
STEP 2: Create a Storage Account:
Now that you’re inside the Azure Portal, it’s time to create a Storage Account. Think of this as setting up your main filing cabinet in the cloud everything else goes inside it.
2.1: Click “Create a Resource” On the Azure Portal homepage, look for the button that says “+ Create a resource” in the top left area. Click it.
2.2: Search for “Storage Account” In the search bar that appears, type “Storage account” and press Enter. You’ll see it appear in the results. Click on it.
2.3: Click “Create” A new page will open describing the Storage Account service. Click the blue “Create” button to begin the setup.
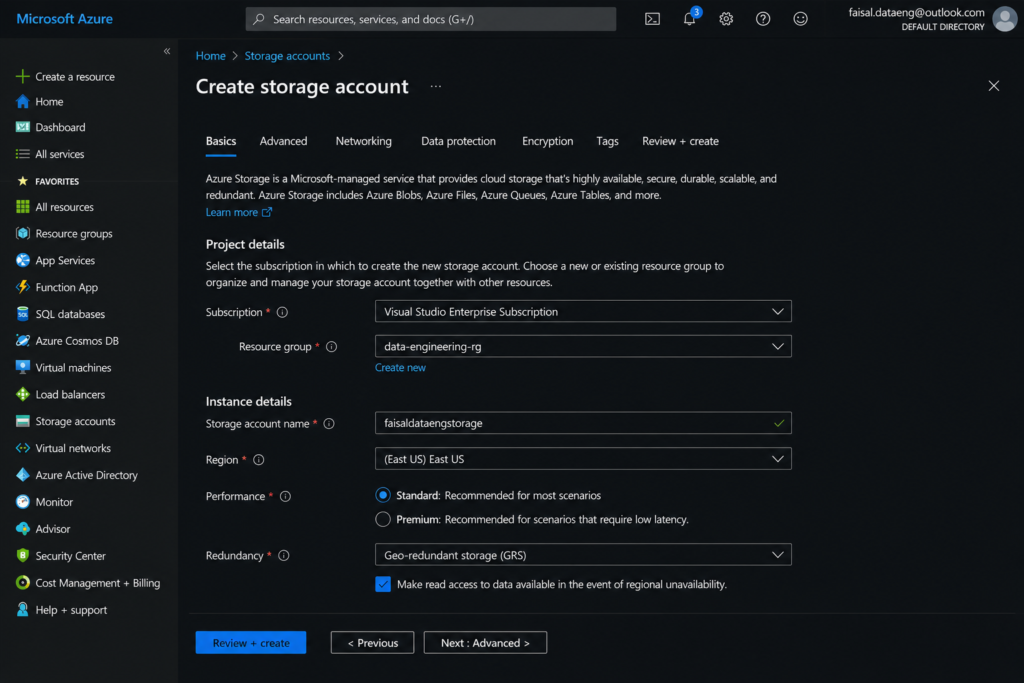
2.4: Fill in the Details You’ll now see a form with several fields. Here’s exactly what to enter:
-
Subscription: This will already be selected as “Free Trial” leave it as is.
-
Resource Group: A resource group is just a folder that groups related Azure services together. Click “Create new,” type a name like
my-first-rg, and click OK. -
Storage Account Name: This must be unique across all of Azure (like a username). Try something like
myblobstorage2026all lowercase, no spaces or special characters. -
Region: Select the region closest to you. For example, if you’re in Pakistan or the Middle East, choose “(Asia Pacific) Southeast Asia” or “(Europe) West Europe.”
-
Performance: Select Standard – this is the default and perfect for beginners.
-
Redundancy: Select Locally Redundant Storage (LRS) the most affordable option. It automatically keeps 3 copies of your data within the same data center.
2.5: Review and Create Click “Review + Create” at the bottom. Azure will validate all your settings. When you see “Validation passed,” click the blue “Create” button. Wait about 30 seconds while Azure sets everything up. When you see “Your deployment is complete,” click “Go to resource.”
Your Storage Account is now live in the cloud.
STEP 3: Create a Blob Container:
Now that your Storage Account exists, you need to create a Container inside it the “folder” where your actual files will live.
3.1: Find “Containers” in the Left Menu Inside your Storage Account page, look at the left sidebar. Scroll down until you see “Containers” under the Data Storage section. Click on it.
3.2: Create a New Container Click the “+ Container” button at the top of the page. A small panel will appear on the right side of your screen.
3.3: Name Your Container In the Name field, type a name for your container. Keep it simple and lowercase something like mycontainer or raw-data or uploads. Container names cannot have spaces or uppercase letters.
3.4: Set Access Level Leave the Public access level set to “Private (no anonymous access)” this keeps your data secure so only you can access it.
3.5: Click Create Click the “Create” button. Your container will appear in the list within a second.
You now have a container ready to hold your files. Think of it as an empty folder sitting in the cloud, waiting for data.

“A container in Azure is like a smart cloud folder organized,
scalable, and accessible from anywhere in the world.”
Think of it this way
STEP 4: Upload Your First File:
This is the most satisfying step. You’re about to move a file from your local computer into the cloud. Here’s exactly how:
4.1: Open Your Container Click on the container name you just created (e.g., mycontainer). You’ll see an empty space this is where your files will appear after upload.
4.2: Click “Upload” At the top of the container page, click the “Upload” button. A panel will open on the right side of your screen.
4.3: Browse and Select Your File Click “Browse for files” or drag and drop a file directly into the upload area. Navigate to the file on your computer a CSV, Excel sheet, PDF, image, whatever you have and select it.
4.4: Click Upload Once your file is selected, click the blue “Upload” button. You’ll see a small progress bar as the file transfers from your computer to the cloud.
4.5: Confirm the Upload When the upload is complete, close the upload panel. You should now see your file listed inside the container with its exact name and file size showing. Click on the file name to see its details URL, size, last modified date, and more.
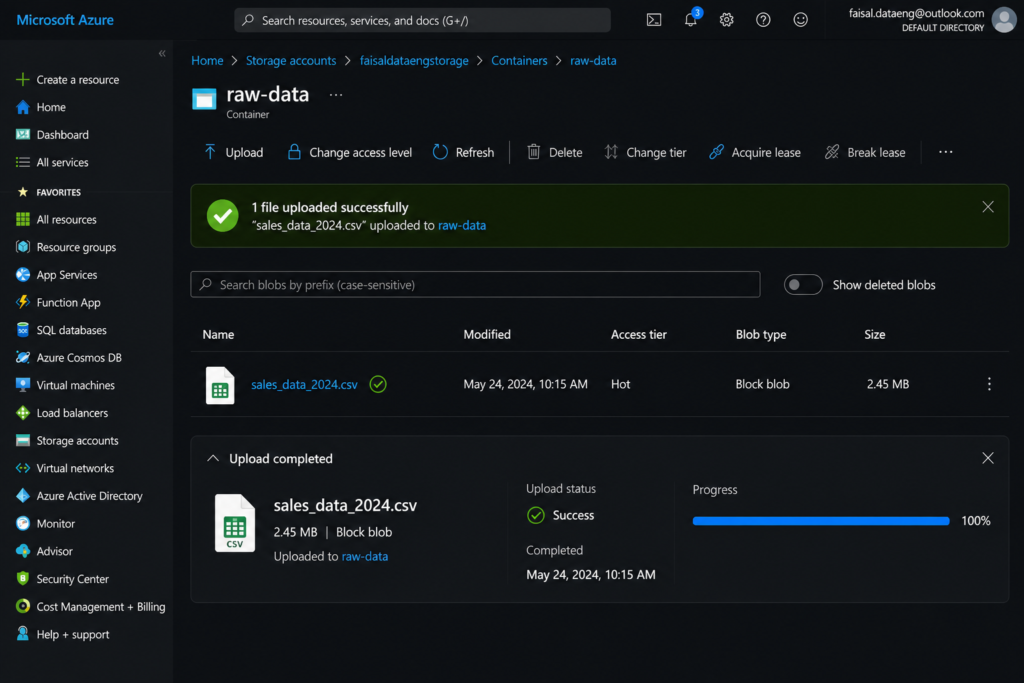
Congratulations:
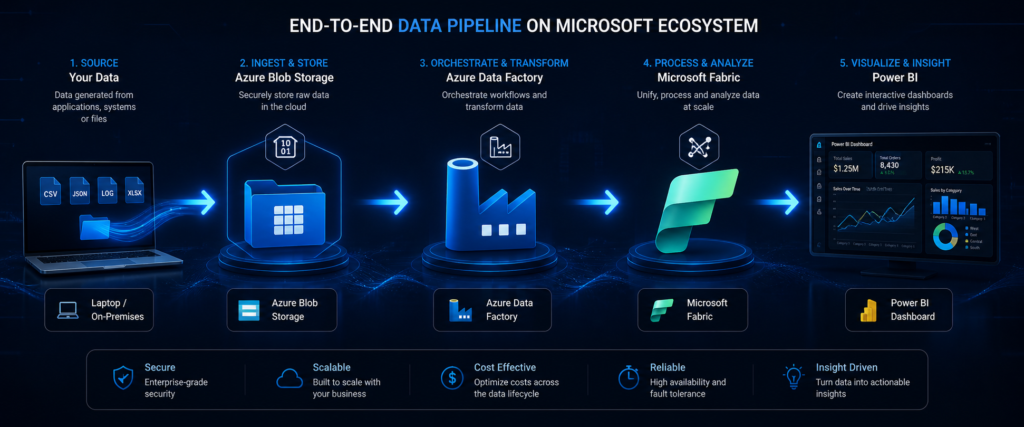
Your file is now stored safely in Microsoft’s cloud infrastructure. It is backed up automatically, accessible from any device, and ready to be connected to tools like Azure Data Factory, Microsoft Fabric, or Power BI.
“You don’t need to be a cloud architect to use the cloud.
You just need 60 seconds and the courage to click Upload.”
Remember This
CONCLUSION:
You just did something that most people think is complicated and you did it in under a minute. You created a free Azure account, set up a Storage Account, built your first container, and uploaded a real file to the cloud.
But this is just the beginning.
Azure Blob Storage is the foundation of almost every modern data engineering pipeline. Once your files live in the cloud, you can connect them to Azure Data Factory to automate data movement, to Microsoft Fabric for advanced analytics, or directly to Power BI for real-time dashboards.
The data engineering journey has many layers but every single one of them starts with getting your data off your laptop and into the cloud. You just completed step one.
The rest is built on top of exactly what you did today.